Hyundai Ioniq: AHB(Active Hydraulic Boost) System / Brake Actuation Unit. Repair procedures
Hyundai Ioniq (AE) 2017-2025 Service Manual / Brake System / AHB(Active Hydraulic Boost) System / Brake Actuation Unit. Repair procedures
| Removal |
| 1. | Turn ignition switch OFF and disconnect the negative (-) battery cable. |
| 2. | Disconnector TCM connector (A). |
| 3. | Disconnector TCM connector (B).
|
| 4. | Loosen the bolt & nut (A) then remove the ECM, TCM with bracket (B).
|
| 5. | Remove the air cleaner. (Refer to Engine Mechanical System - "Air Cleaner") |
| 6. | In case of RHD vehicle, remove the engine and transmission assembly. (Refer to Engine Mechanical System - "Engine and Transmission Assembly") |
| 7. | Remove the brake fluid from the reservoir with a syringe.
|
| 8. | Disconnect the brake hose from the reservoir.
|
| 9. | Disconnect the brake fluid level switch connector (A).
|
| 10. | Disconnect IBAU connecter.
|
| 11. | Disconnect the brake tube from the IBAU (Intergrated Brake Actuation Unit) by loosening the tube flare nut.
|
| 12. | Disconnect the brake tube from the IBAU (Intergrated Brake Actuation Unit) by loosening the tube flare nut.
|
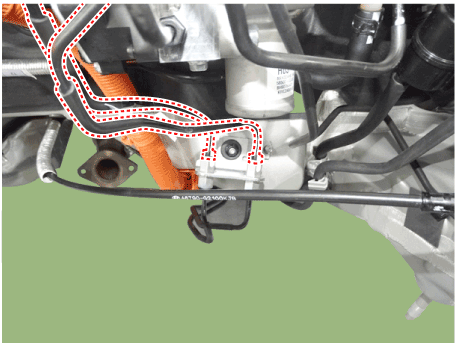
| 13. | Remove the rear brake tube.
|
| 14. | Remove the snap pin (A) and clevis pin (B).
|
| 15. | Remove the mounting nuts (A) and then remove the brake pedal.
|
| Installation |
| 1. | Installation is the reverse of removal. |
| 2. | Check the brake pedal operation. |
| 3. | After filling the brake fluid in the reservoir, perform the air bleed. (Refer to the AHB System - "AHB System Air Bleeding") |
| 4. | Conduct Brake Pedal Traval sensor(PTS) calibration. (Refer to the Brake System - "Brake Pedal") |
| 5. | Conduct Longitidinal G Sensor Clibration. [HAC/DBC only] |
| 6. | Conduct Pressure sensor Calibration. |
| Diagnostic Procedure Using GDS |
The following section describes how to diagnose faults using a diagnostic instrument.
| 1. | Connect the diagnostic instrument to the self-diagnostic connector (16-pin) beneath the crash pad on the side of driver's seat, and then turn on the ignition to activate the diagnostic instrument. |
| 2. | In the GDS Vehicle Type Selection menu, select "Vehicle Type" and "ABS/ESC" System, and then opt for "OK." [Brake Pedal Sensor Calibration]
[Pressure Sensor Calibration]
[Auto Detected Configuration Reset]
[Longitidinal G Sensor Clibration]
|
| 3. | Turn ignition switch off and on after calibration procedure. |
| 4. | Confirm success of calibration. |
 Brake Actuation Unit. Components and components location
Components
•
IBAU (Intergrated Brake Actuation Unit) must not be disassembled.1. Intergrated Brake Actuation Unit (IBAU) ECU2...
 Hydraulic Power Unit. Components and components location
Components
•
PSU (Presser Source Unit) must not be disassembled.1. Pressure Source Unit (PSU)2. Pressure Source Unit (PSU) connector3...
Other information:
Hyundai Ioniq (AE) 2017-2025 Owner's Manual: Unlock Charging Connector in Emergency, Precautions for Portable Charger
Unlock Charging Connector in Emergency If the charging connector does not disconnect due to battery discharge and failure of the electric wires, open the hood and slightly pull the emergency cable. The charging connector will then disconnect . Precautions for Portable Charger (ICCB: In-Cable Control Box) Use the portable charger that is certified by HYUNDAI Motors...
Hyundai Ioniq (AE) 2017-2025 Owner's Manual: Power & Fuel gauge
Power gauge The power gauge indicates whether the current driving condition is fuel efficient or not. • CHARGE : Shows that the energy made by the vehicle is being converted to electrical energy. (Regenerated energy) • ECO : Shows that the vehicle is being driven in an Eco-friendly manner...
Categories
- Manuals Home
- 1st Generation Ioniq Owners Manual
- 1st Generation Ioniq Service Manual
- Check Hybrid system, Check Hybrid system. Turn engine Off
- Coasting Guide (Plug-in hybrid vehicle)
- Immobilizer System
- New on site
- Most important about car
Rear Seats
Folding the rear seat
The rear seatbacks can be folded to facilitate carrying long items or to increase the luggage capacity of the vehicle.
WARNING
Never allow passengers to sit on top of the folded down seatback while the vehicle is moving. This is not a proper seating position and no seat belts are available for use. This could result in serious injury or death in case of an accident or sudden stop. Objects carried on the folded down seatback should not extend higher than the top of the front seatbacks. This could allow cargo to slide forward and cause injury or damage during sudden stops.
Copyright © 2025 www.hioniqae.com


