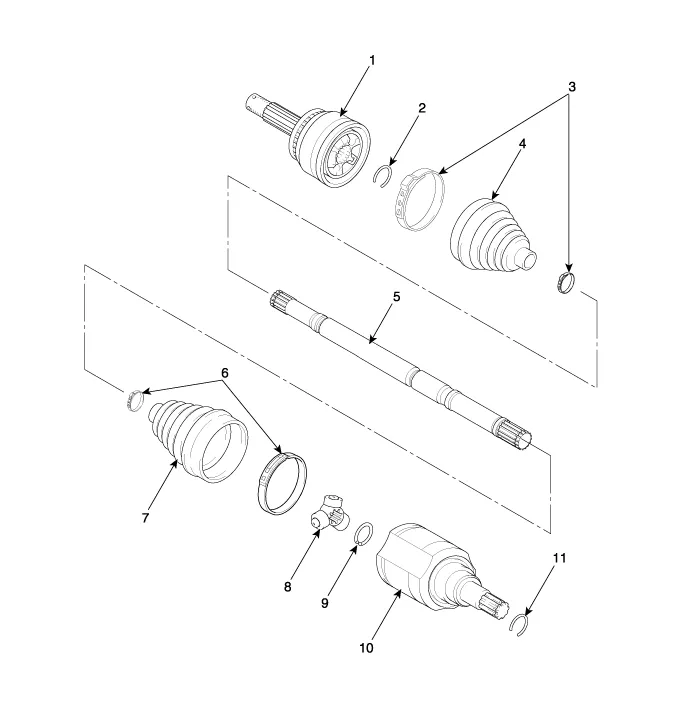
Hyundai Ioniq (AE): Driveshaft Assembly / BJ Boot. Components and components location
Hyundai Ioniq (AE) 2017-2022 Service & Repair Manual / Driveshaft and axle / Driveshaft Assembly / BJ Boot. Components and components location
| Components |

| 1. BJ assembly 2. Circlip 3. BJ boot band 4. BJ boot | 5. Shaft 6. TJ boot band 7. TJ boot 8. Spider assembly | 9. Snap ring 10. TJ Case 11. Clip |
Disassembly • Special grease must be applied to the driveshaft joint. Do not substitute with another type of grease.
Replacement1.Remove the front driveshaft. (Refer to Driveshaft Assembly - "Front Driveshaft")2.Remove the TJ joint assembly. (Refer to Driveshaft Assembly - "TJ Joint")3.
Other information:
Hyundai Ioniq (AE) 2017-2022 Service & Repair Manual: Mode Control Actuator. Components and components location
C
Hyundai Ioniq (AE) 2017-2022 Service & Repair Manual: Description and operation
DescriptionRear view monitor (RVM) will activate when the backup light is ON with the ignition switch ON and the shift lever in the R position.This system is a supplemental system that shows behind the vehicle through the AV monitor while backing-up. • This system is a supplementary function only.
Categories
- Manuals Home
- Hyundai Ioniq Owners Manual
- Hyundai Ioniq Service Manual
- Jump starting procedure
- Normal Maintenance Schedule
- Brake Fluid
- New on site
- Most important about car
Copyright © 2026 www.hioniqae.com - 0.0141
