Hyundai Ioniq: Cooling System / Cooling Fan. Repair procedures
Hyundai Ioniq (AE) 2017-2025 Service Manual / Engine Mechanical System / Cooling System / Cooling Fan. Repair procedures
| Removal and installation |
Cooling Fan Assembly
| 1. | Disconnect the battery negative terminal. |
| 2. | Remove the air cleaner assembly. (Refer to Intake and Exhaust System - "Air Cleaner") |
| 3. | Disconnect the hybrid starter generator (HSG) coolant hoses (A).
|

| 4. | Disconnect the wire harness connector (A).
|

| 5. | Remove the hood latch assembly. (Refer to Body - "Hood Latch") |
| 6. | Remove the cooling fan upper guard (A).
|

| 7. | Remove the cooling fan (A).
|

| 8. | Install in the reverse order of removal. |
Cooling Fan Controller (PWM)
| 1. | Disconnect the battery negative terminal. |
| 2. | Remove the air cleaner assembly. (Refer to Intake and Exhaust System - "Air Cleaner") |
| 3. | Disconnect the wire harness connector (A) and the fan motor connector (B).
|

| 4. | Remove the cooling fan controller (PWM) (A) from the cooling fan shroud.
|

| 5. | Install in the reverse order of removal. |
| Disassembly |
| 1. | Remove the cooling fan (A) from the cooling fan assembly.
|

| 2. | Disconnect the fan motor connector (A) from the cooling fan controller (PWM).
|

| 3. | Loosen the screws and then remove the fan motor (A) from the cooling fan shroud.
|

| 4. | Assemble in the reverse order of disassembly. |
| Inspection |
Fan Motor
| 1. | Disconnect the fan motor connector from the cooling fan controller (PWM). |
| 2. | Connect the battery voltage to the "+" terminal and ground to "-" terminal. |
| 3. | Check the cooling fan motor operates well. |


Other information:
Hyundai Ioniq (AE) 2017-2025 Service Manual: Repair procedures
AHB Brake System Bleeding ProcedureAir Bleeding Tool Installation Procedure • To prevent the brake fluid reservoir tank from beingdamaged and ensure the safety of worker, set thepressure of the gauge to the standard value beforeinstalling the SST...
Hyundai Ioniq (AE) 2017-2025 Owner's Manual: Owner Maintenance
WARNING Performing maintenance work on a vehicle can be dangerous. If you lack sufficient knowledge and experience or the proper tools and equipment to do the work, have it done by an authorized HYUNDAI dealer. ALWAYS follow these precautions for performing maintenance work: Park your vehicle on level ground, move the shift lever into the P (Park), apply the parking brake, and place the Engine Start/Stop button in the OFF position...
Categories
- Manuals Home
- 1st Generation Ioniq Owners Manual
- 1st Generation Ioniq Service Manual
- How to Disconnect Normal Charger
- Checking the Coolant Level
- Temperature control
- New on site
- Most important about car
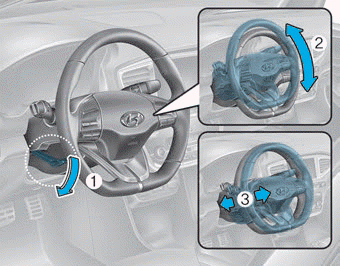
Tilt Steering / Telescope Steering
Adjust the steering wheel so it points toward your chest, not toward your face. Make sure you can see the instrument cluster warning lights and gauges. After adjusting, push the steering wheel both up and down to be certain it is locked in position. Always adjust the position of the steering wheel before driving.
WARNING
NEVER adjust the steering wheel while driving. This may cause loss of vehicle control resulting in an accident.

Copyright © 2025 www.hioniqae.com