Hyundai Ioniq: Interior Trim / Luggage Side Trim. Repair procedures
Hyundai Ioniq (AE) 2017-2025 Service Manual / Body (Interior and Exterior) / Interior Trim / Luggage Side Trim. Repair procedures
| Replacement |
|
|
| 1. | Remove the rear seat assembly (Refer to Rear Seat - "Rear Seat Assembly") |
| 2. | Carefully remove the rear door body side weatherstrip. |
| 3. | Carefully remove the tailgate weatherstrip. |
| 4. | Remove the rear door scuff trim. (Refer to Interior Trim - "Door Scuff Trim") |
| 5. | Remove the rear transverse trim. (Refer to Interior Trim - "Rear Transverse Trim") |
| 6. | Remove the rear wheel house trim. (Refer to Interior Trim - "Rear Wheel House Trim") |
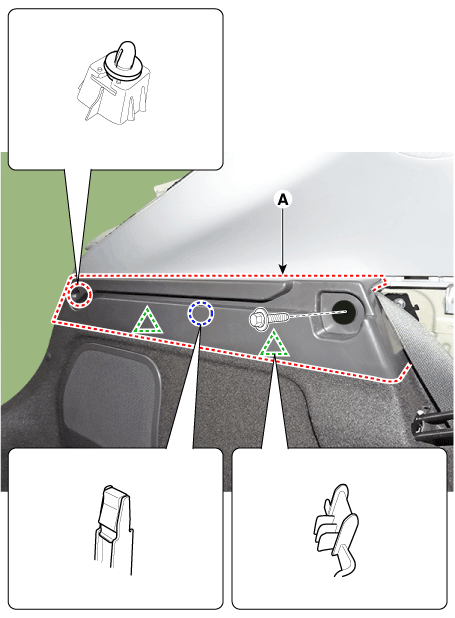
| 7. | Loosen the mounting bolts, remove the sshift side trim covering (A).
|
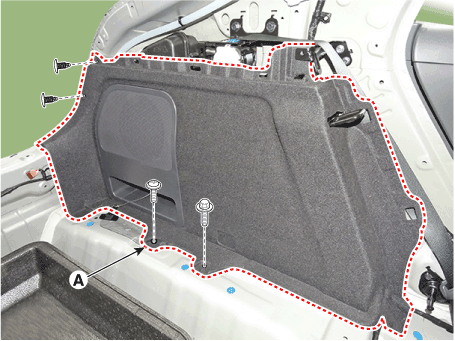
| 8. | After loosening the mounting clips, bolts and screws, remove the luggage side trim (A).
|
| 9. | To install, reverse the removal procedure.
|
Other information:
Hyundai Ioniq (AE) 2017-2025 Service Manual: DCT Control Module (TCM). Schematic diagrams
1. TCM Connector and Terminal Function2. TCM Terminal FunctionConnector [A] Pin Description Pin Description 1Clutch Actuator (Clutch Motor 1 (ODD)_Phase V)17-2Clutch actuator (Clutch Motor 2 (EVEN) Phase V)18Clutch Actuator (Clutch Motor 1 (ODD)_HALL 1)3Select Actuator (Select Solenoid 2 (EVEN)_Ground)19Clutch Actuator (Clutch Motor 1 (ODD)_Sensor Supply)4Select Actuator (Select Solenoid 1 (ODD) Push)20Select Actuator (Select Solenoid 1 (ODD)_Sensor Sensor Supply)5Clutch Actuator (Clutch Motor 1 (ODD)_Phase U)21Select Actuator (Select Solenoid 2 (EVEN)_Sensor Sensor Supply)6Clutch Actuator (Clutch Motor 2 (EVEN)_Phase U)22Select Actuator (Select Solenoid 2 (EVEN)_Sensor Ouput)7Select Actuator (Select Solenoid 1 (ODD)_Ground)23Clutch Actuator (Clutch Motor 2 (EVEN)_HALL 2)8Select Actuator (Select Solenoid 2 (EVEN)_ Pull)24Clutch Actuator (Clutch Motor 2 (EVEN)_HALL 3)9Clutch Actuator (Clutch Motor1 (ODD)_Phase W)25Clutch Actuator (Clutch Motor 2 (EVEN)_Ground)10Clutch Actuator (Clutch Motor 2 (EVEN)_Phase W)26Select Actuator (Select Solenoid 1 (ODD)_Sensor Output)11Select Actuator (Select Solenoid 1 (ODD) Pull)27-12Select Actuator (Select Solenoid 2 (EVEN) Push)28Clutch Actuator (Clutch Motor 2 (EVEN)_HALL 1)13Clutch Actuator (Clutch Motor 1 (ODD)_HALL 2)29Clutch Actuator (Clutch Motor 2 (EVEN)_Sensor Supply)14Clutch Actuator (Clutch Motor (ODD)_HALL 3)30Select Actuator (Select Solenoid 1 (ODD)_Sensor Ground)15Clutch Actuator (Clutch Motor 1 (ODD)_Ground)31Select Actuator (Select Solenoid 2 (EVEN)_Sensor Ground)16-32-Connector [B] Pin Description Pin Description 1-35-2-36-3ON / START Input37-4Paddle Shift (Up) Switch signal38-5Inhibitor Switch "P" Input signal39-6Inhibitor Switch "R" Input signal40-7Inhibitor Switch "D" Input signal41Shift Actuator (Shift Motor 2 (EVEN) _HALL 2)8Sports mode "Down" shift42Shift Actuator (Shift Motor 2 (EVEN) _HALL 3)9Clutch Speed Sensor (EVEN) Ground43Inhibitor Switch "M" Input signal10-44CAN1 Communication Port1 High11-45CAN1 Communication Port1 Low12-46-13Shift Actuator (Shift Motor 1 (ODD) _HALL 2)47-14Shift Actuator (Shift Motor 1 (ODD) _HALL 3)48Flex ray High (BP)15-49Input Speed Sensor Supply 1 (ODD)16-50Input Speed Signal 1 (ODD)17Battery Power Low VBD 51-18Paddle Shift Down signal52-19Shift Lever Select Switch53-20Inhibitor Switch "N" Input signal54Shift Actuator (Shift Motor 2 (EVEN) _Sensor Supply)21Sports mode "Up" shift55Shift Actuator (Shift Motor 2 (EVEN) _HALL 1)22-56Shift Actuator (Shift Motor 2 (EVEN) _Sensor Ground)23Input Speed Sensor Supply 2 (EVEN)57Power Ground 1 for High Current Modules245V spare Sensor Supply output58Power Ground 2 for High Current Modules25-59Shift Actuator (Shift Motor 2 (EVEN)_Phase W)26Shift Actuator (Shift Motor 1 (Odd)_Sensor Supply)60Shift Actuator (Shift Motor 1 (ODD)_Phase W)27Shift Actuator (Shift Motor 1 (ODD)_HALL 1)61 Power Ground 3 for High Current Modules28Select Actuator (Shift Motor 1 (ODD)_Sensor Ground)62-29-63Shift Actuator (Shift Motor 2 (EVEN)_Phase V)30CAN2 Communication Port2 High64Shift Actuator (Shift Motor 1 (ODD)_Phase V)31CAN2 Communication Port2 Low65Motor Sensor Supply Voltage 1 from Direct Battery32-66Motor Sensor Supply Voltage 2 from Direct Battery33-67Shift Actuator (Shift Motor 2 (EVEN)_Phase U)34Flex ray bus, BM68Shift Actuator (Shift Motor 1 (ODD)_Phase U)3...
Hyundai Ioniq (AE) 2017-2025 Service Manual: Side Impact Sensor (SIS). Components and components location
C..
Categories
- Manuals Home
- 1st Generation Ioniq Owners Manual
- 1st Generation Ioniq Service Manual
- Check Hybrid system, Check Hybrid system. Turn engine Off
- Coasting Guide (Plug-in hybrid vehicle)
- Reverse Parking Aid Function
- New on site
- Most important about car
Air Bag Warning Labels

Air bag warning labels, required by the U.S. National Highway Traffic Safety Administration (NHTSA), are attached to alert the driver and passengers of potential risks of the air bag system. Be sure to read all of the information about the air bags that are installed on your vehicle in this Owners Manual.
Copyright © 2025 www.hioniqae.com


