Hyundai Ioniq: Fuel Delivery System / Fuel Tank. Repair procedures
Hyundai Ioniq (AE) 2017-2025 Service Manual / Engine Control/Fuel System / Fuel Delivery System / Fuel Tank. Repair procedures
| Removal |
| 1. | Turn the ignition switch OFF and disconnect the battery negative (-) cable. |
| 2. | Remove the rear seat cushion. (Refer to Body - "Rear Seat Assembly") |
| 3. | Remove the fuel pump service cover (A).
|


| 4. | Disconnect the fuel pump control module connector (A). |
| 5. | Disconnect the fuel pressure sensor connector (B). |
| 6. | Disconnect the fuel feed tube quick-connector (C).
|

| 7. | Lift the vehicle. |
| 8. | Disconnect the vapor tube quick-connector (A).
|
| 9. | Disconnect the fuel filler hose hose (A) and vent hose (B). |
| 10. | Disconnect the leveling quick-connector (C).
|

| 11. | Support the fuel tank with a jack. |
| 12. | Remove the fuel tank band mounting nut (B) |
| 13. | Remove the fuel tank (C) from the vehicle.
|


| Installation |
| 1. | Install in the reverse order of removal.
|
 Release residual pressure in fuel line
Release Residual Pressure in Fuel Line
•
Whenever the high pressure fuel pump, fuel pipe, delivery pipe, or injector is removed immediately after shutting off the engine, an injury may be caused by the release of highly pressurized fuel...
 Fuel Pump. Repair procedures
Inspection[Fuel Sender] 1.Using an ohmmeter, measure the resistance between terminals 1 and 6 of sender connector (A) at each float level. Pin No Discription 1Fuel sender ground 2Fuel pressure sensor (FPS) signal input 3Fuel pressure sensor (FPS) ground (-) 4Ground 5CAN [Low] 6Fuel sender signal 7- 8Fuel pressure sensor (FPS) Power supply (+5V) 9CAN [High] 10Battery power (B+) 2...
Other information:
Hyundai Ioniq (AE) 2017-2025 Service Manual: Repair procedures
Operation and Leakage CheckCheck all of the following items : Component Procedure Integrated Brake Actuation Unit (IBAU) (A) and Pressure Source Unit (PSU) (B)Check brake operation by applying the brakes during a test drive...
Hyundai Ioniq (AE) 2017-2025 Service Manual: Rear Seat Assembly. Repair procedures
Replacement[Rear seat cushion assembly]1.Loosen the mounting bolts, remove the rear seat cushion assembly (A).2.Disconnect the rear seat cushion extension connector (A).3.To install, reverse the removal procedure.[Rear seat back assembly]1.Remove the rear seat cushion assembly...
Categories
- Manuals Home
- 1st Generation Ioniq Owners Manual
- 1st Generation Ioniq Service Manual
- Theft-alarm System
- Hybrid battery SOC (State of Charge) gauge
- Tilt Steering / Telescope Steering
- New on site
- Most important about car
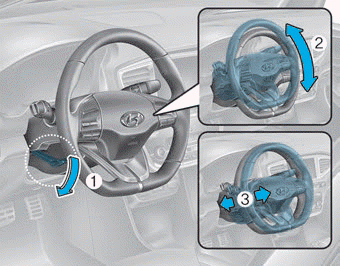
Tilt Steering / Telescope Steering
Adjust the steering wheel so it points toward your chest, not toward your face. Make sure you can see the instrument cluster warning lights and gauges. After adjusting, push the steering wheel both up and down to be certain it is locked in position. Always adjust the position of the steering wheel before driving.
WARNING
NEVER adjust the steering wheel while driving. This may cause loss of vehicle control resulting in an accident.

Copyright © 2025 www.hioniqae.com