Hyundai Ioniq: Input shaft speed sensor 1 / Repair procedures
| Removal |
|

|

| 1. | Shut off the High Voltage circuit. (Refer to General Information - "High Voltage Shutoff Procedure") |
| 2. | Remove the engine room under cover. (Refer to Engine And Transaxle Assembly - "Engine Room Under Cover") |
| 3. | Loosen the drain plug, and drain the inverter coolant. Remove the reservoir cap to help drain the coolant faster. (Refer to Hybrid Motor System - "Coolant") |
| 4. | Remove the HPCU (Hybrid Power Control Unit). (Refer to Hybrid Control System - "Hybrid Power Control Unit (HPCU)") |
| 5. | Remove the ECM (Engine Control Module) and TCM (Transmssion Control Module). (Refer to Engine Control/Fuel System - "Engine Control Module (ECM)") (Refer to Dual Clutch Control System - "DCT Control Module (TCM)") |
| 6. | Remove the HPCU (Hybrid Power Control Unit) tray. (Refer to Hybrid Control System - "Hybrid Power Control Unit (HPCU)") |
| 7. | Disconnect the input shaft speed sensor connector (A).
|

| 8. | Remove the clutch actuator assembly. (Refer to Dual Clutch Transmission Control System - "Clutch Actuator") |
| 9. | Remove the input shaft speed sensor (A).
|

| Installation |
| 1. | Install in the reverse order of removal.
|


Other information:
Hyundai Ioniq (AE) 2017-2025 Service Manual: Hydraulic Power Unit. Repair procedures
Removal1.Turn ignition switch OFF and disconnect the negative (-) battery cable.2.Remove the wiring bracket.3.Remove the brake fluid from the reservoir with a syringe. • Do not spill brake fluid on the vehicle, it may damage the paint; if brake fluid does contact the paint, wash it off immediately with water...
Hyundai Ioniq (AE) 2017-2025 Service Manual: Refrigerant Line. Repair procedures
Replacement1.If the compressor is marginally operable, run the engine at idle speed, and let the air conditioning work for a few minutes, then shut the engine off. 2.Disconnect the negative (-) battery terminal. 3.Recover the refrigerant with a recovery / charging station...
Categories
- Manuals Home
- 1st Generation Ioniq Owners Manual
- 1st Generation Ioniq Service Manual
- Hybrid battery SOC (State of Charge) gauge
- Checking the Coolant Level
- Reverse Parking Aid Function
- New on site
- Most important about car
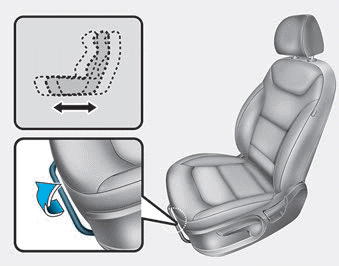
Manual adjustment
The front seat can be adjusted by using the levers located on the outside of the seat cushion. Before driving, adjust the seat to the proper position so that you can easily control the steering wheel, foot pedals and controls on the instrument panel.
Forward and rearward adjustment

Copyright © 2025 www.hioniqae.com