
Hyundai Ioniq (AE): Smart Key System / Smart Key Unit. Schematic diagrams
| Circuit Diagram |
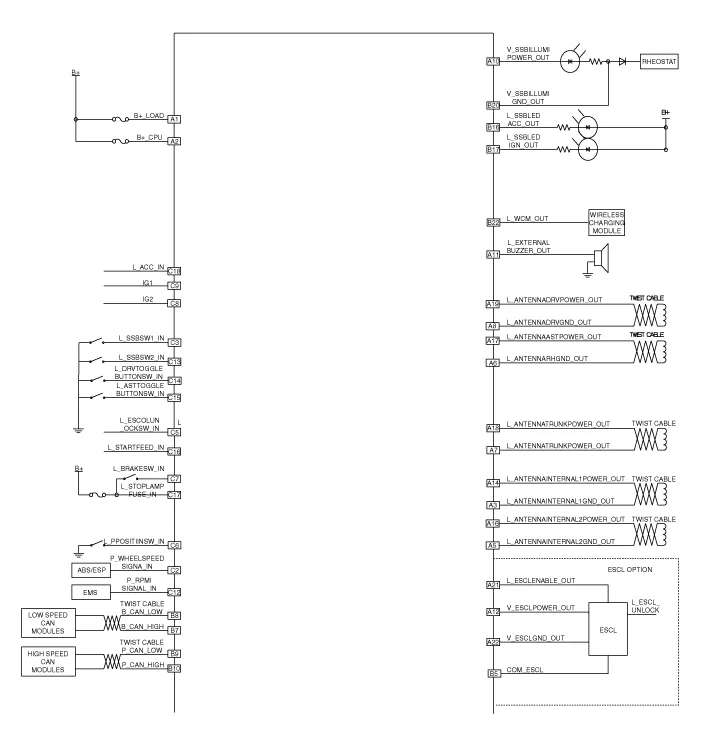
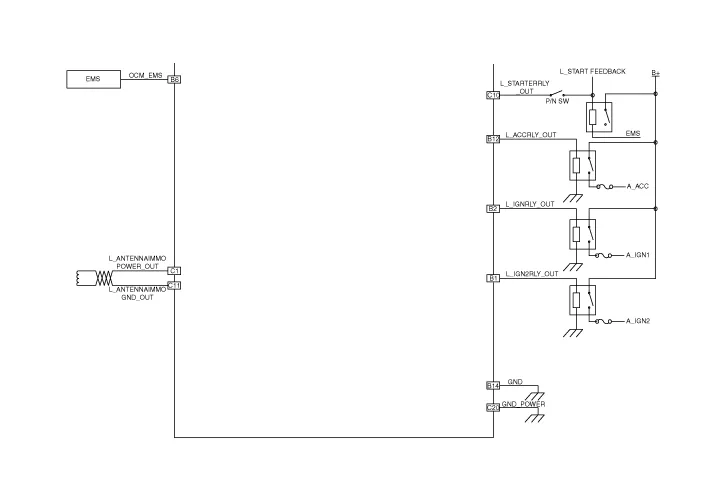
Components (1) No Connector A Connector B Connector C 1Battery (+)_LOADIGN2 Relay outputImmobilizer antenna power input2Battery (+)_CPUIGN1 Relay outputWheel speed signal input3Antenna ground (Internal1)-SSB Switch1 signal input4---5Antenna ground (Internal2)B-CAN (Low)ESCL Unlock switch signal input6Antenna ground (Assist)EMS CANP Position switch signal input7Antenna ground (Trunk)B-CAN (High)Brake switch signal input8Antenna ground (Driver)B-CAN (Low)Ignition 2 signal input9-P-CAN (Low)Ignition 1 signal input10SSB Illumination power (Output)P-CAN (High)Starter relay output11External buzzer output-Immoblizer antenna ground12ESCL Power outputACC Relay outputRPM Signal input13--SSB Switch2 signal input14Antenna power (Internal1)Signal groundDriver toggle button switch signal input15--Assiste toggle button switch signal input16Antenna power (Internal2)SSB ACC LED OutputStarter relay feedback signal input17Antenna power (Assist)SSB IGN LED Output Stop lamp fuse signal input18Antenna power (Trunk)-ACC Signal input19Antenna power (Driver)--20-SSB Illumination groundPower ground21ESCL Enable output-22ESCL Ground outputWireless charging module output
RemovalSmart Key Unit1.Disconnect the negative (-) battery terminal.2.Remove the glove box.(Refer to Body - "Glove Box Upper Cover Assembly")3.Remove the smart key unit (A) after disconnecting the connectors (B) and loosening the bolt and nut.
Other information:
Hyundai Ioniq (AE) 2017-2022 Service & Repair Manual: Auto Defogging Sensor. Description and operation
DescriptionThe auto defogging sensor is installed on the front window glass. The sensor judges and sends signal if moisture occurs to blow out wind for defogging. The air conditioner control module receives signal from the sensor and restrains moisture and eliminate defog by controlling the intake actuator, A/C, auto defogging actuator, blower moto
Hyundai Ioniq (AE) 2017-2022 Service & Repair Manual: Components and components location
C
Categories
- Manuals Home
- Hyundai Ioniq Owners Manual
- Hyundai Ioniq Service Manual
- Jump starting procedure
- If the 12 Volt Battery is Discharged (Hybrid Vehicle)
- Engine Control/Fuel System
- New on site
- Most important about car
